Check-ins
Learn how to create, update, and remove Check-ins with the following tutorial. For help with managing Moments, click here.
In this tutorial:
Frequently asked questions
Learn more about how location sharing works with Check-ins with these frequently asked questions.
What are Location Services (iOS) and app location settings (Android)?
-
Location Services and Location Settings are how you control an app's access to the location information associated with your mobile device.
How will OurFamilyWizard use my location when I create a Check-in?
-
In order to create Check-ins through the OurFamilyWizard mobile app, the app needs access to your location. That's because Check-ins only allow for shared locations to be within 500 feet (about 150 meters) of your current location. When you choose to create a Check-in, the OurFamilyWizard app will access your location to make sure the location you select is within 500 feet of you.
Can I remove the app's access to my location?
-
Yes! You can turn off the app's access to your location at any time through your phone's settings. Follow these links for instructions on how to do this:
Note: If you remove the app's access to your location, you will be unable to create a Check-in.
Will I always be in control of when and with whom my location is shared?
-
Yes, you will always be 100% in control of sharing your location. Your location will only be shared if you create a Check-in and choose to share the entry.
You also have control over who sees your Check-ins. You can create private Check-ins, or you can choose to share them with your co-parent, third-party or child accounts. Shared Check-ins will also be visible to any practitioners to whom you've granted professional access.
Creating Check-ins
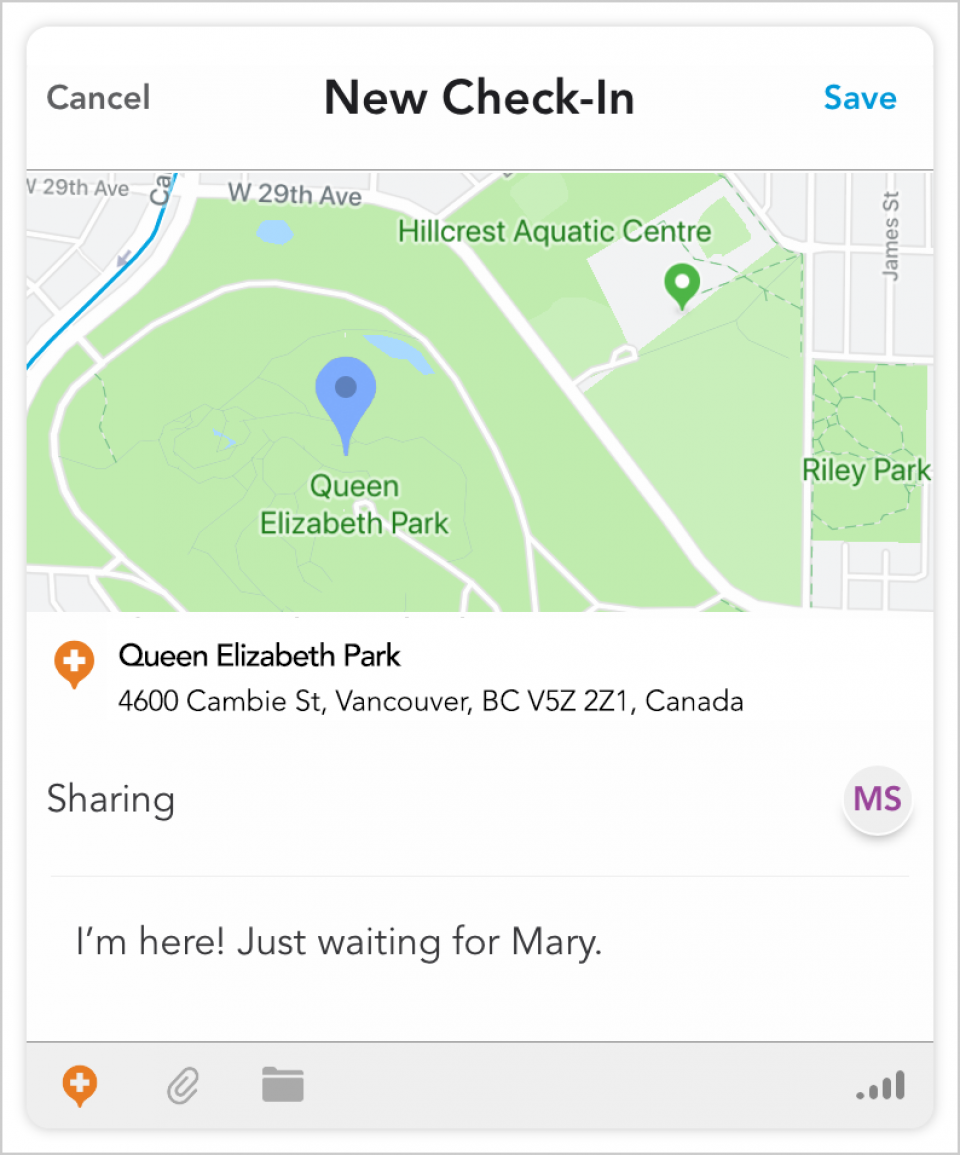
- Tap the Add Item button, then tap Check-in.
- You will be immediately prompted to select a location. The location you select must be within 500 ft (about 150 meters) of your current physical location. Use the map to move the cursor to the location you wish to tag or search for the address using the Search icon at the top-right corner of your screen.
Once you're ready, tap Select This Location to make your selection. - Choose whether you'd like to keep your entry private or share it with other family members or practitioners. Your entry will default to private, but you can adjust this by tapping within the section for Sharing then tap Share.
Select any family members with whom you'd like to share your Check-In, then tap Done to save your selection. Any entry you share will be viewable to any practitioners connected to your account. If you wish to only share your Check-In with your practitioner(s), do not select any family members from the list below and simply tap Done. - If you wish to include notes with your entry, tap within the field below where it says 'Start typing here...'. If you have ToneMeter™ activated for your account, look to the bottom-right corner of your screen to review its analysis of the content you have written in your Check-In.
- You can also attach one or multiple photos and MyFiles to your entry. Tap the paper clip icon to attach images from your phone's camera roll or iCloud drive. Tap the folder icon to select any of your MyFiles to associate with this entry. From either section, select Done to save your selection.
- Tap Save to save your Check-in.

Editing or Deleting Check-ins
You can edit or delete Check-ins that you created, but you cannot edit or delete Check-ins created by your co-parent.
- Tap the Journal icon in the main navigation bar at the bottom of your screen.
- From the Journal, tap the section for Check-ins.
- Locate the Check-in you wish to edit or remove. You can also use the search function to run a keyword search for the entry in question. Once you've located the entry, tap it to select it.
- Edit: To edit, tap Edit at the top-right corner of your screen. You can edit your sharing options, your note, and your attachments on this entry. You cannot edit the location tagged to your Check-in. Tap Done to save your edits.
- Delete: To delete, tap Edit at the top-right corner of your screen, then tap Delete Check-in.

Viewing Check-in Details
- Tap the Journal icon in the main navigation bar at the bottom of your screen.
- From the Journal, tap the section for Check-ins.
- Tap the Check-in you wish to view.
- If you wish to view more information about the location, tap the map. You will be prompted to navigate to the Maps app on your phone so you can view a map of the tagged location.
- Tap any of the images or MyFiles in this entry to view them in full. You can export images from Check-ins and save them to your device.
- Tap View History at the bottom of the entry to view details about when the entry was created, edited, or marked as no longer private. For entries that are shared with your co-parent, you'll also see when the entry was previewed and viewed.
- First Previewed: This date/time signifies when your co-parent previewed the entry while viewing the Check-in or All lists within the Journal feature. By previewing the entry, they can view some information including the location of the Check-in, when it was created, and the first lines of the note included in the entry.
- First Viewed: This date/time signifies that your co-parent opened the Check-in entry. By opening an entry, they can view its complete details including the location of the Check-in, the complete history showing when the entry was created or edited, the complete note, and any attachments included with the entry.